I’ve had a love/hate relationship with my walls since I moved into this house. I fall in love with a color, I paint the walls, and I quickly fall out of love…then the process starts again. My husband jokes that our front hallway is a bit more narrow now than when we moved in 3 years ago…
I had been slowly falling in love with Behr Laurel Leaf for a few months before hubbs surprised me one weekend with a beautifully painted kitchen and dining room, and the second I laid eyes on it I fell out of love. Don’t get me wrong, its a lovely seafoamy-green color, but it just didn’t turn out  looking the way I had expected. This shade of green is just not friendly enough to match with other greens so my curtain-finding process has left me with a major headache and a naked window. This weekend however, I finally found the PERFECT fabric that matches EXACTLY with the walls!
With my heart set on making a faux Roman shade for the kitchen window I bought 1 1/2 yards, but when I got home and realized just how perfect my find was, I marched myself right back to Joann Fabrics and bought 6 more yards. Today, I’m going to show you a quick and easy way to sew a faux Roman shade.
Supplies:
- curtain fabric: I recommend used a heavier weight, 100% cotton designer fabric; it’s very easy to work with, and has a nice drape to it once it’s hung
- fabric for the lining: you can use a heavier-weight blackout fabric, but I used 100% cotton muslin
- matching thread
- cutting mat and rotary cutter, or good quality fabric scissors
- needle, and pins
- sewing machine & seam ripper (because let’s be honest, they go hand-in-hand)
- yard stick or ruler
To prepare, make sure your curtain fabric and lining are both ironed. If you ever plan to wash your curtain, you should probably also wash the fabric, because it may shrink a bit.
Next, you’ll need to determine if you want to inside or outside mount your curtain, so that you can figure out how to take measurements. For my project, my kitchen window (measured from the insides of the molding) is 36″, however since I want an outside mount I’m going to use the 41″ measurement which I took from the outsides of the moldings.
 When purchasing and cutting your fabric, you’ll need to make sure it’s wide enough to cover your window, and allow an extra few inches for the hem. For an outside mount curtain, you’ll also need to decide if you want the curtain to be a bit wider than the window. I wanted mine to be this way, and it worked out perfectly since my fabric is 45″ wide. This will easily allow a 1″ seam on each side of my curtain, and a 1″ overhang. Make sense? (Note: Not all fabric bolts are 45″, so be mindful of this when measuring your window and choosing your fabric. If you choose wider fabric, you’ll have to cut it to size, and if you choose fabric that’s more narrow than your window you’ll have to seam pieces together. This may be a pain if your fabric has a pattern in it like mine, because you’d have to match up the pattern before seaming.)
So at this point I’ve determined that the width of my fabric is perfect as-is, but it’s way too long, because I bought 1 1/2 yards, remember? I know that I will want my completed project to be hung by a rod several inches above the window, and hang down far enough to cover the top quarter of the window, and I also have to allow about 4 inches for hemming. Once I measured my space, I determined that I needed the length of my fabrics to be 23″ (4″ for my hem, and a 19″ finished curtain which would allow me to hang the curtain rod 4″ higher than my window frame). Lay out your curtain fabric with the fabric lining on top. With the mat and rotary cutter, or scissors, measure the fabric to the desired length (for me, 23″) then cut! Make sure you are cutting a very straight line, especially if your fabric has a pattern in it. The last thing you want to happen is to finish and hang your project, to find that your fabric pattern is crooked. Always measure twice, and cut once.
Now that we have our supplies ready and fabric prepped and cut, we’re ready to start sewing!
1) Start with the side hems. Place your curtain fabric on a flat surface with the wrong side facing up, and lay your lining fabric on top with it’s right side facing up. Make sure the fabric lays flat, with no wrinkles. Fold each side of your fabric in 1″, and pin in place. Iron the seam flat, then sew with matching thread, removing your pins as you go.
2) For both your bottom hem and rod pocket, follow the same direction as #1 above. The only difference however, is that you will make a double hem which will provide some stability. To do this, fold your fabrics up/down 1″, pin, and iron. Then, fold the fabric over a second time, pin, and iron.  Sew these hems on the inner edge of the fabric, removing your pins at you go. Sewing on the innermost part of your hem will allow space for the curtain rod to fit through, as you can see in this picture. (If you are using a very wide curtain rod, you may want to use a 1 1/2″ or larger hem for the top)
3) Using a needle and thread, use a slip stitch to close the open hem on the bottom of your curtain and to secure your fabric, like in this picture.
4) Now you should have something that resembles a curtain! Insert your rod, and hang your curtain. It will hang flat, and look kinda boring, so move on to step 5.
5) To finish the project, the final step is to give the curtain the faux Roman shade look. I chose to do this with the curtain already a hanging, because I could play with the fabric as I went, to make sure it drapes the way I want it to. To do this, just pinch an inch or so of fabric up, and secure it with a few stitches with your needle and thread. Do this 2-3 times on each side of the bottom of your curtain, then stand back and admire your new beautiful window!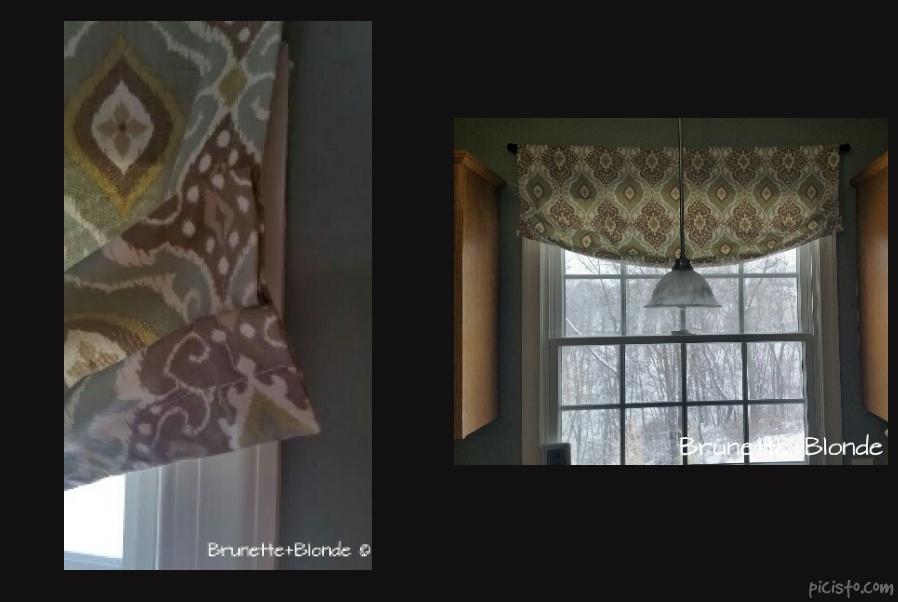
Next, I’ll be making long curtain panels to match, which will hang over my French door. Stay tuned…
Cheers,
Sara

Pingback: Afternoon Drapes: A Tutorial |